One thing we weren't happy about with our van was the light grey seat covers which no matter how hard we tried, kept getting dirty and picking up stains.
We really liked the dark grey interiors fitted to the Globecars so set about trying to find a company that could replicate them for us. A quick Google and we landed on Motorhome Seat Covers but the colours and styles on their website weren't what we were after. We searched some more but wasn't able to find anyone so we got in contact with Motorhome Seat Covers to see what they could do.
Shortly after we explained our requirements, samples started to arrive in the post. In total three envelopes arrived stuffed full of different dark, light and colorful samples. We decided that the only way to make an informed decision was to make our way to Stockport and see them for ourselves.
Upon arrival we were greeted by Dee who guided us expertly through the piles of upholstery at his disposal offering us leather, suede, cloth and even real sheepskin!
He explained that there were two seat covers he could make for us - Made to Measure would be exactly the same as the original seat covers with separate headrest covers and would fit accordingly. These were priced in the region of £120 for a front pair depending on the fabric used, more of course for the leather. However he offered a cheaper product made of the same material but with elasticated bottoms and thus less labor intensive to make and easier to fit, at roughly £60 a pair. We decided that the intention of the seat covers was to protect the seat and thus "expensive" covers would defeat the object since we would be worrying about them all the time!
We also wanted our rear seat doing in the same upholstery which Dee was only too happy to do for us. The cushions were taken inside and used as a template while his machinist created covers made out of the same fabric as we chose for our seats.
It's worth mentioning that in my experience of owning a motorhome I've never received the level of customer service that Dee @ Motorhome Seat Covers gave me and delivered me a product exactly what I was expecting and for what I feel was an excellent price. He has just moved to new premises which allows you to drive you vehicle in and have the seats re-covered as you see fit in a wide range of materials. Most motorhome owners won't want a dark interior like us (we've matched it up with dark grey carpets and black edging we made ourselves!) but we're really happy. If you are looking at getting your seats recovered, I'd recommend getting in touch!
1.) Bookshelves / TV & Laptop Shelf in the Rear
2.) Cup Shelf in the Rear
3.) Pop up worktop in the Kitchen Area
4.) Shower holder
5.) Towel Rail
6.) Kitchen Storage
7.) Stealth / Insulating Curtains
8.) Improved LED Lighting
9.) Improved Underbed Organisation
10.) Increased battery capacity
11.) Full length mirror in wardrobe
12.) Improved waste tank drain
1.) Bookshelves / TV & Laptop Shelf in the Rear For us the main reason for buying the Twin was the fixed rear bed, our main use of the van is to drive and sleep so the fixed bed makes the task of "making up a bed" non-existent. However, we felt that the space at the bottom could be better ultilised and we wanted to be able to watch TV or more likely place a laptop at the end of the bed to watch. We also seem to carry with us in inordinate supply of travel books (did someone say Amazon Kindle?) so needed somewhere to store them.
B&Q must have supplied Adria to start with, because their contiboard is the same colour as our twins interior! With the addition of a brushed aluminium dowel it made a perfect bookshelf with space for both our 10" Avtex and 13" Laptop. The wood is contoured to the shape of the rear wall and screwed together and from above and is very solid.
We added 1x 240v and 1x 12v sockets underneath for power and couldn't help put add a strip of remote controlled colour changing LED lights for a bit of fun!
2.) Cup Shelf in the Rear
There is nowhere to put your brew in the bed of the Twin we found, so this little shelf is a perfect addition. Simply screwed and braced from inside the wardrobe it fits two cups with room for a couple of biscuits or a glass of water and mobile phones on a night (probably not the best combination!).
Underneath is stores the LED light remote control and the remote for the Avtex TV.
3.) Pop up worktop in the Kitchen Area
The newer Twins come equipt with a pull out worktop which when retracted is stored on top of the grill. This wasn't really an option for us and even so would probably not extend as far as we wanted it to.
With a bit of help from Rowley on the MHF forums we managed to find a suitable bracket rated upto 40KG. While eyewateringly expensive at £20 delivered for the pair there really wasn't any alterantive so we went ahead and purchased a pair of these brackets.
The brackets are fixed to the interior but also braced heavily from behind, we will make sure not to put undue weight towards the end of the shelf but it is a handy length for placing a wine glass in an evening!
While it does obscure the cubby holes its no hardship having to raise the table in order to access them.
4 & 5.) Shower Holder & Towel Rail
Nice easy one, for reasons I've not yet fathomed the Twin doesn't come with a shower head holder, so we fitted on here. Part was £5 from Towsure @ the NEC.
The towel rail was just some brushed aluminium rail from B&Q and two wall mounted ends - total cost a couple of quid and allows for extra storage and privacy as it also doubles as a screen for the window.
In addition we also added a trigger shower head from Caravan Components in Hull which was just £5 and allows you to set the temperature and 'pause' the water while maintaining the same temperature on resume.
6.) Kitchen Storage
Nice and easy, couple of spice racks off eBay for £10 delivered, great for throwing bits and pieces in to save getting lost in cupboards and drawers
7.) Stealth / Insulating Curtains
The perfect way to keep in warmth when wildcamping on a night - fleece lined curtains which Velcro across the whole cab entrance. Also allows the cab seats to remain forward facing and thus the van appears empty or at least less obvious then silver / remis blinds pulled across. We've also found they improve the efficiency of the cab air con since it is cooling a smaller space. Big thanks to Sophie's Mum for sewing them for us! We used a smaller piece of the same material under the bed instead of the wooden divide. You'll also notice we've recovered our seats - click here to see the article about the covers.
8.) Improved LED Lighting
We've already wrote a post about LED lighting in our van, which cab new viewed by clicking this link. The only addition to which is a new home for our previously "too bright" 5050 LED strip - that is behind the curtain strip above the table. These are so bright that they light the whole van and use next to no power - meaning the roof mounted lights are now almost redundant! 9.) Improved Under-bed Organisation
To me the use of the under bed area makes or breaks the twin. We tried many combinations before arriving at this one. 4 large stacking boxes are accessible from the rear, while 4 further smaller stacking boxes are accessible from inside the van meaning nearly all of the available area is used. A small divide allows for leveling blocks, fiamma screens and folding chairs to be stacked without impeding the removal of the boxes which slide out with ease. 10.) Increased Battery Capacity
We managed to fit 2x 86AH batteries into the compartment with no problems at all, increasing our capacity to 172AH. Coupled with our 2x 11kg Gaslow kit we shouldn't have any issues with heating or lighting!
11.) Full length mirror in wardrobe
Sophie wanted a full length mirror, so we purchased 2x A3 perspex mirror sheets off eBay for under £10. Slight 'house of mirrors' effect where they join but for its use and the price I certainly won't be complaining!
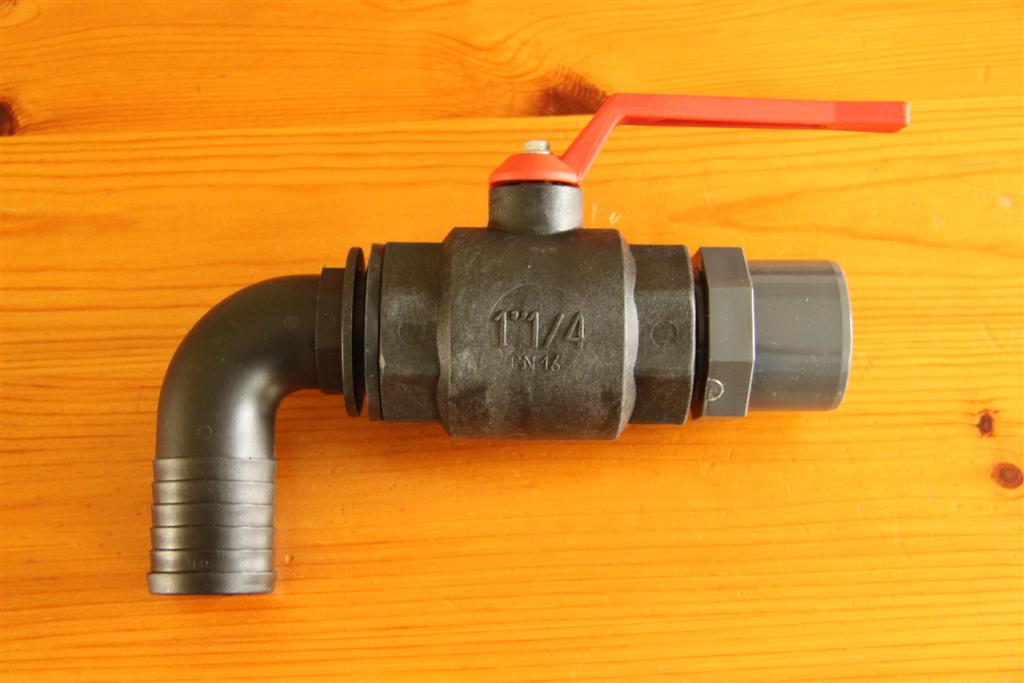
12.) Improved waste tank drain
Bought from CAK tanks and will be fitted shortly, check back for an update!
And here she is fitted. The cable ties are a temporary measure while I fabricate an L shaped bracket to support the front part of the drain, which is now flush with the valance and makes for much easier access and lining up of the van over a grate. The wooden support blocks, which are fixed to the chassis, will be painted black. Despite how it looks from the photo the pipe is totally level and drains effectively, the 40mm pipe fits into the existing waste tank attachment.
Our dashboard mounted laptop is one of the things that has really revolutionised how we navigate and plan our journeys. We have been using a laptop alongside our TomTom since our very first tour in 2008 and has in the past been balanced precariously on the dashboard or on the passengers knee and we wanted to find a better way of mounting it securely but also being able to quickly remove it without plugging in an endless array of cables.
The solution presented itself in the form of a cheap laptop manufactured by Dell and aimed at the corporate market. As such it is available with a huge selection of accessories such as docking stations, extended batteries, 12v power packs and so forth.
The view form the Drivers Seat - the screen isn't visable so no distractions Click Photo to Enlarge
Our setup comprises of:
A Dell PRO1X Dock (£10 off eBay)
A 4.62A 12v Power Adapter to power the Dock & Laptop (£7 off eBay)
The Dell D430 really does make this installation for a number of reasons. Firstly the 64GB SSD (Solid State Drive) means that the laptops internal drive is not subjected to the rough roads which would probably make it fail in a short space of time. It is available with 2 different batteries and should your power supply fail or is wired into the ignition it will continue to power both the laptop and the dock without an external source once booted.
Despite being a fairly old machine it cost around £2,000 in 2007 but owing to the fact so many were sold it has really hammered down the second hand price to around £100. There are various options available but I would try and get hold of a 1.2Ghz Dual Core model which has a 2Mb cache which really makes the difference in terms of speed, also try and find a version with XP rather then bloated Windows Vista. They all come with Bluetooth for connection to a mobile phone and some are available with built in 3G data cards.
The Docking Station Fixed to the Dash Click Photo to Enlarge
In our 2007 Fiat Ducato we don't have a passenger airbag which makes mounting the laptop easier, the dock was simply fitted to a wooden base which was cut to shape the infill and then screwed into place with two self tapping screws. In 8 months and 17,000 miles it hasn't moved an inch!
Once placed on the dock the laptop automatically charges while connecting to the USB devices; the GPS antenna, the roof mounted wifi antenna and the USB 3G dongle. It can, if you wish, also connect to your vans headunit to play music or the speak directions through the cab speakers if you wish. No manual connection of cables is required and the dock holds the laptop so securely that it is impossible to come off and the keyboard and mouse are very usable in situe.
View from Passenger Seat running Map Point (to be replaced by Autoroute 2010) Click Photo to Enlarge
The laptop then fixes to the dock and is sturdy enough not to wobble and easily sturdy enough to use the mouse or keyboard without worrying about breaking anything - the dock really does clip into place well.
You'll also notice the location of the TomTom in the pictures, sat on top of the removable cup ash tray. I hate wires (the ones you see for the laptop will be re-routed soon) so I stuck a TomTom adhesive dashboard pad to the top of the holder and cut two very small holes at the back and the front of the wire so all the excess cable is hidden away and the TomTom plugs into the cig lighter. It is much easier to access from the passenger seat without heaving to reach forward to the Windscreen or the paperwork clip!


 Upon arrival we were greeted by Dee who guided us expertly through the piles of upholstery at his disposal offering us leather, suede, cloth and even real sheepskin!
 It's worth mentioning that in my experience of owning a motorhome I've never received the level of customer service that Dee @ Motorhome Seat Covers gave me and delivered me a product exactly what I was expecting and for what I feel was an excellent price. He has just moved to new premises which allows you to drive you vehicle in and have the seats re-covered as you see fit in a wide range of materials. Most motorhome owners won't want a dark interior like us (we've matched it up with dark grey carpets and black edging we made ourselves!) but we're really happy. If you are looking at getting your seats recovered, I'd recommend getting in touch!